A cramped bathroom doesn’t have to stay that way. Whether working with a 5×7-foot powder room or a master bath squeezed into an awkward footprint, smart remodeling choices can stretch the space, and the wallet. This guide covers practical bathroom remodel ideas for small bathrooms, from clever storage hacks to lighting that opens up the room visually. The best part: many of these upgrades don’t require gutting the whole space. Start with what makes the biggest impact, build from there, and don’t skip the prep work.
Table of Contents
ToggleKey Takeaways
- Smart storage solutions like vertical wall shelves, medicine cabinets with mirrors, and under-sink organizers are essential for decluttering small bathrooms without requiring major renovations.
- Light, neutral paint colors combined with layered lighting (overhead, vanity, and ambient) instantly expand perceived space in bathroom remodel ideas for small bathrooms.
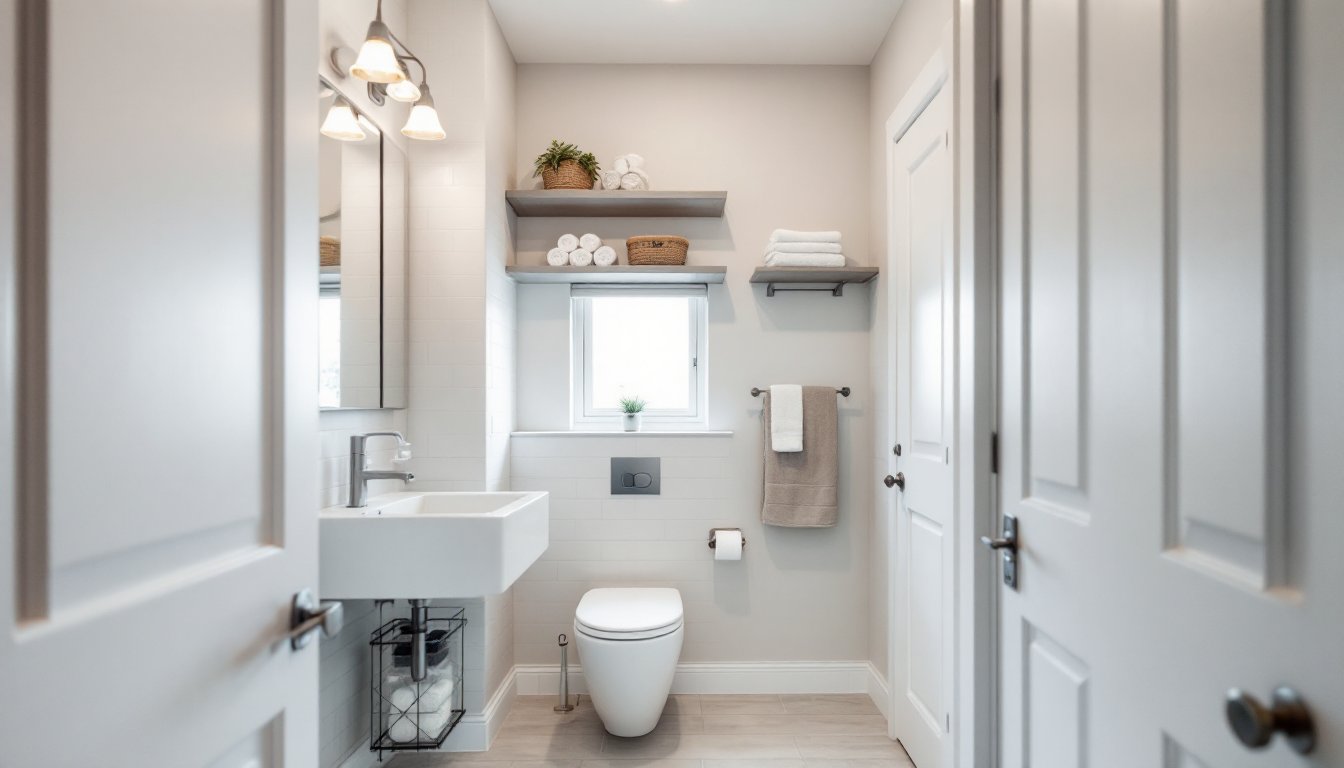
- Floating vanities and compact toilets expose floor space and create an airier feel, while pocket doors or sliding barn doors eliminate swing space constraints in tight layouts.
- Strategic lighting upgrades—such as 24–36-inch vanity light bars and 4-inch recessed lights—eliminate shadows and brighten the entire room with minimal installation.
- Budget-friendly upgrades like painting vanity cabinets, regrouting tile, replacing faucets, and refreshing caulk deliver significant impact for $100–300 without hiring contractors.
- Prioritize storage and lighting first, then layer in fixture upgrades and layout tweaks as budget allows—smart remodeling works within constraints rather than requiring a complete gut renovation.
Smart Storage Solutions to Declutter Your Compact Bathroom
Clutter makes small spaces feel smaller. The fix isn’t more storage, it’s smarter storage.
Vertical storage is your best friend. Wall-mounted shelves above the toilet (keeping at least 24 inches clearance from the center line per standard fixture placement) free up floor real estate while staying functional. Open shelving works for decorative baskets or rolled towels: closed cabinets hide cleaning supplies and personal items.
Medicine cabinets with mirrors do double duty: reflection expands the perceived space while hidden shelving handles daily essentials. Recessed models sit flush with the wall and don’t steal inches. Surface-mounted options are cheaper to install, no drywall cutting required, but they protrude into the room slightly.
Drawer organizers and stackable containers prevent the chaos that derails small-space living. Assign zones: hair tools in one container, skincare in another, medications in a third. Clear containers let you see what’s inside without opening everything.
Under-sink space often goes to waste. A tiered shelf organizer or sliding basket system transforms the area under the vanity into dedicated zones for cleaning supplies, extra toilet paper, and plumbing access. Measure your sink opening and pipe locations before buying, rough plumbing can limit options.
Don’t overlook the back of the bathroom door. An over-the-door organizer or narrow towel rack holds linens and robes without taking up wall space. Make sure the door swings freely, this is one of those details that derails small bathrooms if ignored.
Color and Lighting Tricks That Make Small Bathrooms Feel Larger
Paint color and light are the two fastest ways to transform perceived space. Neither requires structural work, and both pay off immediately.
Best Paint Colors for Expanding Your Space
Light, neutral tones are the classic choice for small bathrooms. Soft whites, warm beiges, and pale grays reflect light and keep walls from closing in. Avoid dark colors on all four walls, they absorb light and shrink the space visually.
An accent wall can work if chosen carefully. Paint the wall opposite the entry in a deeper, cooler tone (soft blue or muted sage) while keeping the other three walls light. This creates visual depth without overwhelming the room.
Glossy or semi-gloss finishes bounce light better than flat paint. Use at least a semi-gloss finish on bathroom walls to improve moisture resistance and reflectivity. Matte finishes absorb light and show watermarks more readily, not ideal in bathrooms.
Monochromatic schemes (multiple shades of one color family) are cohesive without feeling dark. Pair a light gray wall with a slightly deeper gray vanity and you get dimension without cramping the space.
Paint typically covers 300-400 square feet per gallon depending on surface porosity and finish. For a small bathroom (roughly 40–80 square feet of wall space), one gallon covers two or three coats with room to spare.
Strategic Lighting for a Brighter Bathroom
Overhead lighting is essential, but a single ceiling fixture rarely lights a small bathroom evenly. Add vanity lighting on both sides of the mirror, this reduces shadows on the face and brightens the entire room. A 24–36-inch vanity light bar above the mirror is standard for 24–30-inch vanities.
Layered lighting (overhead + vanity + ambient) makes the space feel larger. Recessed ceiling lights (also called pot lights or can lights) offer clean lines without taking up visual space. A 4-inch or 5-inch recessed light with a trim ring sits flush with the ceiling, ideal for low-clearance bathrooms.
Light color temperature matters. Choose 3000K (warm white) or 4000K (neutral white) for bathrooms. Avoid 5000K+ (cool/daylight), which can feel harsh in small spaces. Look for “soft white” or “neutral white” labels on bulb packaging.
Maximize natural light if you have a window. Avoid heavy curtains: opt for a simple roller shade or frosted film for privacy. A small window becomes a visual asset when uncluttered.
LED bulbs last 25,000+ hours and use 75% less energy than incandescent. They fit standard sockets and are now cheaper than halogen alternatives, a no-brainer upgrade.
Space-Saving Fixtures and Layouts for Tight Bathrooms
Fixtures set the layout. Downsizing thoughtfully gives back inches without sacrificing functionality.
Floating vanities (wall-mounted, not pedestal) expose floor space underneath, this single visual trick makes the room feel airier. A 24-inch-wide vanity is tighter than 30 inches but still workable for one user. Ensure the wall studs are in the right spot or use appropriate heavy-duty floating shelf brackets rated for the vanity weight plus water load (typically 100–150 pounds). Relocating plumbing to accommodate a floating vanity costs money: measure existing rough-in locations (usually 4–6 inches from the back wall) before committing.
Compact toilets save 4–6 inches in depth compared to standard models. A dual-flush model uses less water (1.28 gallons per flush vs. 1.6 gallons standard), beneficial for both utility bills and septic systems. Modern compact toilets are comfortable: they’re not as cramped as they sound.
Combination shower-tub units take up less footprint than separate fixtures. If replacing, a 5-foot tub is standard: a corner or alcove configuration against two walls is more space-efficient than an island tub. If space permits, a corner shower stall (24×24 inches minimum) replaces a tub entirely and frees valuable real estate.
Pocket doors slide into the wall cavity instead of swinging outward, freeing 20–40 square feet of swing space. Installation requires removing the interior framing between studs, doable for a second person with basic carpentry, but messy. Pre-hung pocket door kits ($150–300) simplify the job. If you’re not comfortable with framing, a sliding barn door (hung from a track above the frame) offers the same space-saving benefit without wall surgery.
Corner sinks tuck into tight nooks and are available in 17–20-inch widths. They sacrifice some counter space but open up the floor plan for movement.
Budget-Friendly Upgrades That Don’t Require a Full Renovation
Not every improvement requires a contractor or a second mortgage. Strategic, phased upgrades deliver impact on a DIY timeline and budget.
Refresh the vanity without replacing it. Paint the cabinet with a quality bathroom-grade paint ($30–60 per quart) and new hardware ($20–80 for a full set). Remove the old handles, fill screw holes with wood filler, sand smooth, prime, and paint. This takes a weekend and costs $100–150.
Regrouting tile tightens a tired look for under $50 in materials. Use a grout saw or oscillating multi-tool with a grout blade to remove old grout (messy but necessary to prevent mold), then apply new epoxy or urethane grout. Epoxy is more stain-resistant: urethane is easier to apply. This is labor-intensive but accessible to beginners.
Replace fixtures strategically. A new faucet ($40–150) installed in an afternoon transforms the sink. New hardware (towel bars, toilet paper holders, shower caddy) costs $100–200 total and requires only a drill and level.
Update lighting affordably. Swap out a dated ceiling fixture for a modern flush-mount light ($30–80) or install a vanity light bar above the mirror ($40–120). Most swaps require turning off power at the breaker, disconnecting the old fixture, and wiring the new one, a 30-minute job if you’re comfortable with basic electrical work. Call an electrician if you’re unsure: safety first.
Caulk and sealant refresh ($15–30 in materials) seals gaps around the tub, shower, and sink. Remove old caulk with a caulk removal tool or utility knife (tedious but important), then apply fresh, mold-resistant silicone. Smooth with a wet finger or caulk tool for a pro finish.
Paint the walls ($30–80 total cost) is the fastest impact. Prep is critical: clean surfaces, patch holes, prime any bare spots. Two coats of quality paint plus a weekend of work beats waiting for a contractor.
Conclusion
Small bathroom remodels succeed when you prioritize vertically, lighten the visual load, and choose fixtures that multiply function. Start with storage and lighting, they’re fast, affordable, and return immediate results. Layer in fixture upgrades and layout tweaks as budget and timeline allow. The key is not tearing down and rebuilding from scratch: it’s working smarter within the constraints you have.

