Bathroom lighting often gets overlooked until it’s too late, harsh shadows over the sink, a mirror that looks like a black hole at night, or flickering fixtures that make morning routines a chore. Vanity lighting fixtures solve these problems by providing task lighting right where it’s needed most. Whether someone is updating a tired bathroom or building new, choosing and installing the right vanity lighting fixture makes a real difference in both functionality and aesthetics. This guide walks through the essentials: what vanity fixtures are, the main types available, how to select one that fits the space and budget, and how to install it safely without calling an electrician for routine work.
Table of Contents
ToggleKey Takeaways
- Vanity lighting fixtures eliminate shadows over the sink and mirror by positioning light at eye level (36–40 inches above the countertop), providing the clear illumination needed for grooming tasks.
- Choose between sconces (ideal for mirrors wider than 30 inches) or over-mirror strips (best for narrow bathrooms), and aim for 800–1500 total lumens in the 3000K–4100K color temperature range.
- LED bulbs are the cost-effective choice for vanity fixtures, lasting 25,000+ hours and reducing energy costs by about 80% compared to incandescent alternatives.
- Proper installation of vanity lighting requires turning off power at the breaker, using a voltage tester to confirm the circuit is dead, and ensuring GFCI protection within 6 feet of the sink per NEC code.
- Match your vanity lighting fixture finish to bathroom décor—brushed nickel and matte black suit modern styles, while oil-rubbed bronze and brass work for transitional or farmhouse bathrooms.
What Are Vanity Lighting Fixtures?
Vanity lighting fixtures are specialized light sources installed above, beside, or surrounding a bathroom mirror to provide clear, shadow-free illumination for grooming tasks. Unlike general overhead lighting, vanity fixtures focus light on the face and counter surface, critical for makeup application, shaving, and other detail work.
The key difference from standard bathroom lighting is placement and brightness. A vanity fixture sits much closer to eye level, typically mounted 36 to 40 inches above the countertop. This proximity eliminates the shadows that downward-pointing ceiling fixtures create. Good vanity lighting also uses sufficient lumens (typically 800 to 1500 lumens for a standard bathroom) to mimic natural daylight without creating glare.
Color temperature matters too. Bathroom vanity lighting should fall in the 3000K to 4100K range (neutral white to cool white). This mimics daylight and helps people see their true complexion, rather than the yellow-orange cast of warm (2700K) bedroom lighting. Building codes don’t typically mandate vanity lighting, but most modern building standards recommend it for bathrooms 5 feet or wider.
Types of Vanity Lighting Fixtures
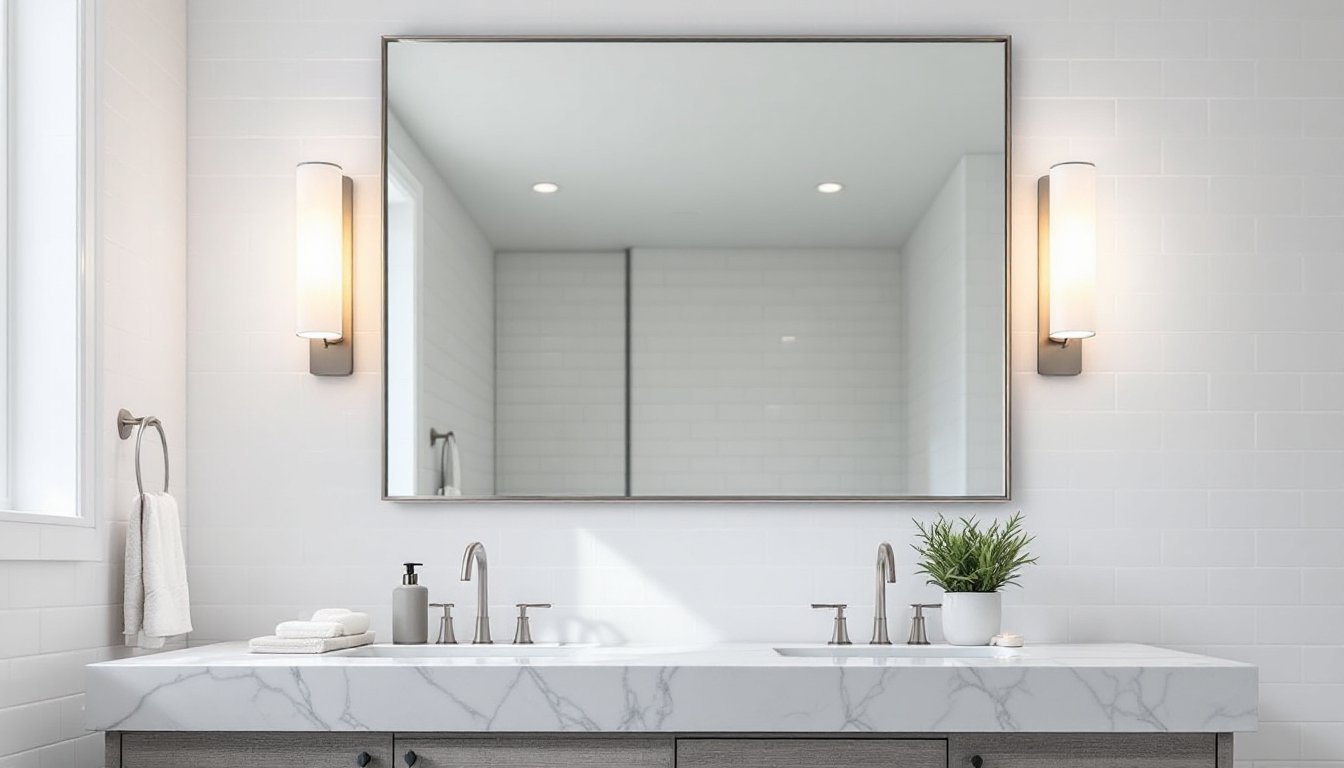
Sconce Lighting
Sconces are individual light fixtures mounted on either side of the mirror. This two-fixture setup is the most common approach and for good reason: light from both sides eliminates facial shadows and provides balanced, even illumination. Each sconce typically holds one or two bulbs and mounts 36 to 40 inches above the countertop, about 24 to 30 inches apart.
Sconces come in countless styles, modern cylinders, vintage-inspired brass arms, farmhouse lanterns, contemporary glass orbs, so matching bathroom décor is straightforward. They’re also easier to install than over-mirror strips: most require only wall-mounting hardware and a standard 120V connection (either hardwired or plug-in). The downside is that sconces take up wall space, which can feel cramped in a small bathroom.
Over-Mirror and Strip Lights
Over-mirror fixtures (also called floating bars or vanity strips) mount directly on top of or behind the mirror. These single-unit fixtures deliver light across the entire width of the mirror surface, making them ideal for narrow bathrooms where wall-mounted sconces won’t fit.
Strip lights use a series of small bulbs in a linear housing, typically LED tubes or capsule bulbs, to distribute light evenly. They’re compact, modern-looking, and energy-efficient, especially LED models. Modern backlit mirror fixtures integrate lighting directly into the mirror glass itself, which is sleek but more expensive and usually requires professional installation due to electrical complexity. Over-mirror strips are straightforward to hang: they bolt directly to the wall and require a standard outlet connection, though some models need hardwiring.
How to Choose the Right Fixture for Your Space
Selecting a vanity fixture depends on four factors: bathroom size, mirror width, existing décor, and electrical setup.
Mirror and wall space come first. Measure the mirror width. For mirrors wider than 30 inches, two sconces work well (one on each side). For narrower mirrors or tight spaces, a single over-mirror strip is more practical. Wall depth matters too, if studs run close to the mirror surface, mounting hardware might interfere.
Lumens and color temperature affect function. Aim for 800 to 1500 lumens total output: split that between two sconces (400 to 750 each) or use a single strip of equivalent brightness. Select 3000K to 4100K color temperature. Warm (2700K) fixtures are cozy for bedrooms but wash out skin tones at the bathroom mirror. Cool (5000K+) options are overly clinical and can look harsh.
Bulb type shapes long-term costs. LED bulbs last 25,000+ hours and cost about 80% less to run than incandescent. If the fixture uses standard screw-in bulbs (E26 or G9 bases), LED replacements are cheap and easy. Integrated LED fixtures (where bulbs are non-replaceable) cost more upfront but need no future bulb swaps.
Style and finish should complement the bathroom. Sconces in brushed nickel or matte black pair with modern décor: oil-rubbed bronze or brass work for transitional or farmhouse styles. Over-mirror strips skew contemporary, so they suit modern bathrooms better. Don’t overlook finish durability, bathroom humidity demands corrosion-resistant materials like anodized aluminum, stainless steel, or powder-coated metals. Bare chrome and untreated brass tarnish quickly.
Electrical access is practical. If existing vanity wiring is already in place (most bathrooms have an outlet or hardwired fixture nearby), mounting a sconce or strip is a weekend job. If no power is available, you’ll need to run new wire, acceptable for handy DIYers, but hire an electrician if you’re unsure about running wire inside walls.
Installation and Safety Considerations
Installing a vanity fixture requires basic tools: a voltage tester, screwdriver, drill, level, and wire strippers. Always turn off power at the breaker before starting: use a voltage tester to confirm the circuit is dead. This is non-negotiable, electrical shock from bathroom circuits can be lethal.
For sconce installation:
- Mark mounting holes on the wall, level with the desired height (36–40 inches above the countertop). Most sconces include a template: use it.
- Drill pilot holes and install wall anchors if mounting between studs. If hitting a stud, drill directly into it (no anchors needed).
- Turn off power and disconnect the existing fixture (if replacing) or verify the circuit is dead (if adding new wiring).
- Mount the sconce bracket and connect the hot wire (typically black), neutral (white), and ground (bare copper or green) to the junction box inside the fixture. Wire nuts secure connections: twist until tight, wrap with electrical tape.
- Screw the fixture faceplate and bulb into place.
- Restore power and test.
For over-mirror strips:
- Measure and mark mounting holes at the top or sides of the mirror frame.
- Drill pilot holes and install anchors or hit studs as above.
- Mount the fixture bracket and connect wiring as described for sconces.
- Slide or bolt the light bar into the bracket and secure.
Safety reminders: Wear safety glasses when drilling: bathroom dust and drywall particles are irritating. If water is present or the wall is damp, do not begin electrical work. Ensure the bathroom exhaust fan runs during and after work to clear moisture. GFCI (ground-fault circuit interrupter) outlets or breakers are required within 6 feet of a sink in US bathrooms (NEC Article 210.8): verify existing circuits meet this. If work involves running new wire in walls, check local electrical codes, some jurisdictions require a licensed electrician for anything beyond simple fixture swaps. When in doubt, hire a pro.
Conclusion
A well-chosen vanity lighting fixture transforms bathroom functionality and appearance. The right setup eliminates shadows, improves task lighting for grooming, and adds style, all within a weekend and a modest budget. Whether opting for classic sconces or a sleek over-mirror strip, prioritize lumens, color temperature, and secure installation. Measure twice, turn off power, and don’t hesitate to hire an electrician if wiring feels uncertain. Good bathroom lighting is worth the effort.

