Pendant lighting has moved beyond kitchens and entryways, bedroom pendant lights are now a practical and stylish choice for layered home lighting. They provide focused task light over a nightstand or vanity, while their design can anchor a room’s aesthetic without demanding the floor space of a table lamp. Whether someone’s working with a modern minimalist vibe or a cozy vintage feel, pendants offer flexibility that fixed ceiling fixtures alone can’t match. The key is understanding the right styles for bedrooms, where to hang them, and how to integrate them with other light sources to create the ambiance that works for both function and rest.
Table of Contents
ToggleKey Takeaways
- Pendant lighting for bedrooms provides both task lighting and aesthetic appeal by hanging at eye level (12-18 inches below ceiling or 60-66 inches from floor), making them more versatile than overhead fixtures or table lamps alone.
- Modern minimalist and industrial/vintage styles are the primary bedroom pendant lighting options, each offering distinct benefits—clean lines for contemporary spaces and warm character for traditional settings.
- Proper installation requires an existing electrical box for safety; a pair of pendants should hang 30-36 inches apart, and professional help is essential if new wiring is needed to avoid building code violations and fire hazards.
- Layered lighting—combining ambient overhead light, task light from pendants, and accent lighting—creates flexible ambiance control, especially when paired with LED-compatible dimmers and warm white (2700K) bulbs for relaxation.
- Pendant lighting converts valuable nightstand surface space into usable area while offering dimmer-compatible brightness adjustment, making it a cost-effective bedroom upgrade that supports both rest and daily routines.
Why Pendant Lights Work In The Bedroom
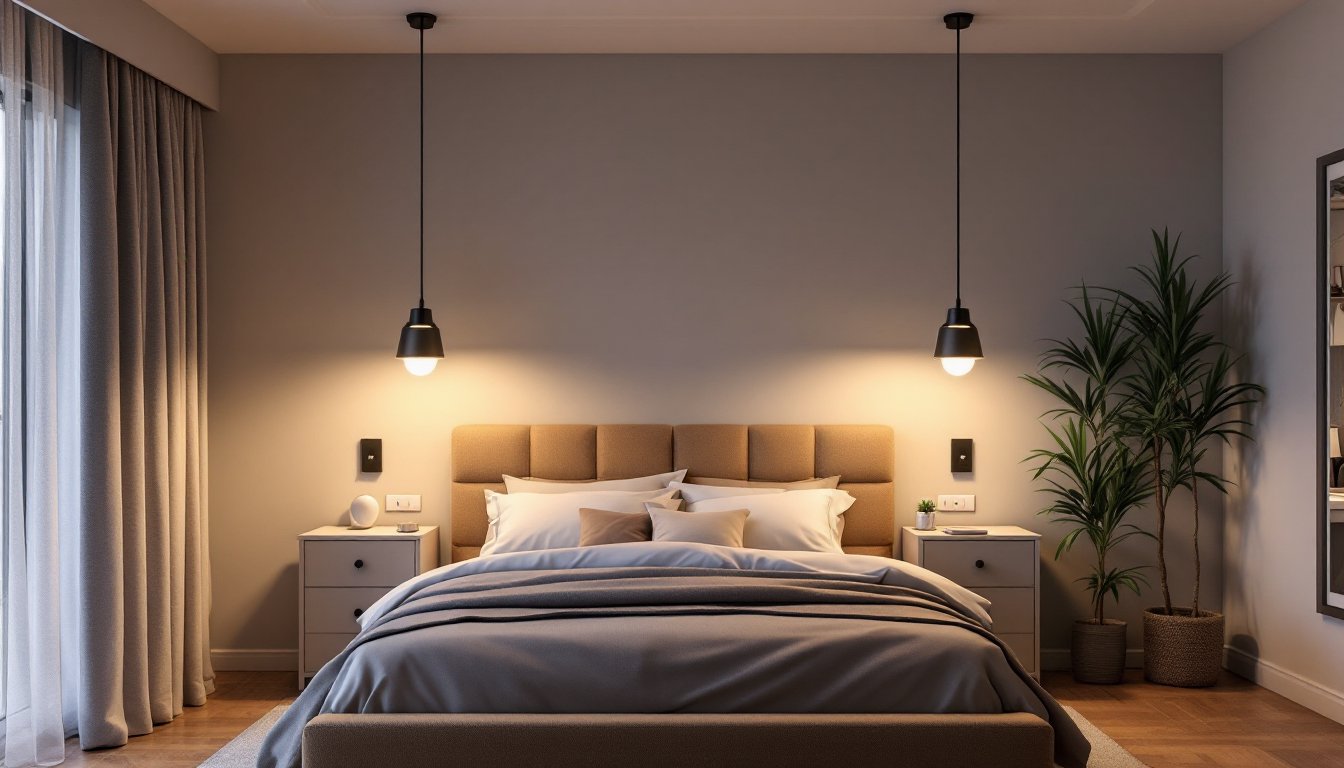
Pendant lighting serves dual roles in a bedroom that overhead fixtures or table lamps alone can’t manage. They hang at eye level (typically 12 to 18 inches below a ceiling fan or 60 to 66 inches from the floor when mounted above a nightstand), delivering task light exactly where someone reads or grooms without overshadowing the room’s overall mood.
Unlike recessed ceiling lights that flatten a bedroom’s character, pendants become part of the décor while remaining functional. A pair flanking the bed replaces bedside table lamps and opens up valuable surface space. They’re also easier to install than you might think, if electrical rough-in already exists above the nightstand or vanity, the retrofit takes an afternoon.
Pendants are forgiving too. Dimmer-compatible models let residents adjust brightness from relaxation mode to full illumination for getting ready. And since styles range from sleek to rustic, they adapt to nearly any bedroom aesthetic without looking like an afterthought.
Choosing The Right Pendant Style For Your Space
Modern And Minimalist Designs
Modern pendant fixtures emphasize clean lines, geometric shapes, and neutral finishes. Look for white, matte black, or brushed brass pendants with simple drum, cone, or spherical shades. These designs won’t date and work well in contemporary bedrooms where restraint is the goal.
Popular options include cylindrical metal shades (often aluminum or powder-coated steel) and frosted or clear glass globes. The frosted variant softens light diffusion while maintaining a refined look. Pair modern pendants with Edison-style bulbs (clear filament or warm white) for added visual interest without sacrificing the minimalist approach.
One practical note: matte black finishes show dust and fingerprints, so factor in occasional cleaning. Brushed brass or satin nickel are lower-maintenance alternatives that still feel current.
Industrial And Vintage Options
Industrial pendants, think exposed metal cage shades, metal Edison bulbs, and rope or chain hangers, bring warmth and character. These work especially well in older homes or bedrooms with reclaimed wood or shiplap accents. Vintage reproductions offer nostalgia without requiring an actual 1920s fixture.
Seeded glass and amber-tinted shades are hallmarks of industrial style: they cast a warm glow and hide dust better than clear glass. Pair them with warm white (2700K) LED bulbs to avoid harshness.
Vintage styles also tolerate mixed metals, a brass canopy with a copper shade, for example. Keep shade diameter between 8 and 12 inches for bedroom scale: oversized fixtures crowd the space overhead. If someone’s converting an old table lamp into a pendant (a popular hack), ensure the electrical box and chain support at least 50 pounds, most pendants weigh 2–5 pounds, but always verify.
Placement And Installation Tips
Location matters as much as style. The most common placements are above each nightstand, flanking the bed (one on each side), or above a vanity or desk area. Hang them 30–36 inches apart if using a pair, and position them 60–66 inches from the floor so the bottom of the shade clears head height when someone sits on the bed.
If no existing electrical box is above the nightstand, don’t be tempted to jury-rig something. Running new wire requires cutting into the ceiling, possibly relocating joists, and obtaining a permit from the local building department. That’s work for a licensed electrician. But if the bedroom has a ceiling fan box or existing outlet above that location, converting it to pendant-ready is straightforward.
Installation checklist: Turn off power at the breaker. Use a stud finder to confirm there’s no joist directly above the mounting point (or locate it so the old-work electrical box or remodel box avoids the joist). Secure the mounting bracket with provided anchors if there’s no joist, or lag bolts into the joist itself. Feed the pendant’s wire through the canopy, connect it to the house wiring using wire nuts, and twist them clockwise until snug. Cap with electrical tape if needed. Test the light before closing the wall.
Common mistakes: failing to turn off power (dangerous), not checking for joists (fixtures sag), and using undersized wire anchors (they pull free within months). If uncertain, a sparky’s 30-minute visit beats a garage fire.
Lighting Layers And Ambiance Control
Pendant lighting works best as part of a three-layer scheme: ambient (overhead), task (pendants), and accent (bedside sconce or reading light). Bedrooms especially benefit from this approach because a single pendant can’t do everything. Morning light for getting ready? Check. Evening reading without a separate lamp? Yes. But middle-of-the-night bathroom trip without waking the partner? That’s where a dimmed pendant or motion-sensing night light shines.
Pair pendants with a wall dimmer switch rated for LED bulbs (standard dimmers sometimes flicker with LEDs: look for smooth dimming LED dimmers). This lets someone dial brightness from 10% (soft glow while reading) to 100% (full task light). Install the dimmer in the same wall box as the pendant switch for clean control.
Color temperature is critical in bedrooms. Warm white (2700K) promotes melatonin production and relaxation: cool white (4000K) or daylight (5000K) is better reserved for task areas (vanity, desk). Choose 2700K LED bulbs for pendants unless there’s a specific task reason otherwise. Look for bulbs rated 90+ CRI (Color Rendering Index) so colors appear natural, not dingy.
Finally, consider the shade material’s effect on light distribution. Opaque shades (metal, ceramic) funnel light downward, ideal for focused task work. Translucent shades (frosted glass, linen) scatter light more softly, better for general ambiance. Many bedrooms benefit from a hybrid: solid metal shades with a translucent inner diffuser.
Conclusion
Pendant lighting transforms bedrooms from one-note spaces into layered, functional rooms. By selecting a style that fits the décor, installing them safely at the right height, and pairing them with proper dimming and color temperature, a homeowner or renter creates flexible lighting that supports both rest and routine. Start with a single pendant over the vanity or one side of the bed, nail the install, and expand from there. It’s a project that returns more ambiance per dollar spent than almost any other bedroom upgrade.

