LED outdoor lighting strips have become a go-to solution for homeowners looking to upgrade their yard’s ambiance and functionality. Unlike traditional outdoor lighting that guzzles energy and burns out frequently, LED strips offer efficient, long-lasting illumination that can be installed without hiring an electrician for many applications. Whether someone’s framing a deck, highlighting landscape features, or adding task lighting to a patio, LED outdoor lighting strips deliver flexibility and control that older options simply can’t match. The technology has matured enough that even DIY beginners can handle installation, though understanding placement, waterproofing, and power requirements upfront prevents costly mistakes down the road.
Table of Contents
ToggleKey Takeaways
- LED outdoor lighting strips consume 80% less energy and last 25,000–50,000 hours, delivering significant savings on energy bills and replacement costs compared to traditional outdoor lighting.
- Choose IP65-rated strips for most residential applications like decks and railings, or IP67 for wet areas and pool edges, to prevent premature corrosion and failure.
- Proper installation of LED outdoor lighting strips requires clean surface preparation, secure mounting with adhesive tape or clips, and careful power routing along building perimeters away from foot traffic.
- RGB color-changing and smart-enabled strips offer advanced control and automation through apps or voice assistants, though WiFi-dependent options may be less practical in areas with spotty connectivity.
- Spring inspections of connections and caulking joints prevent corrosion and moisture damage, while a simple dry cloth and brass brush cleaning maintain performance and longevity.
- Start with a single LED strip installation on the deck to test placement, brightness, and color performance before expanding to other outdoor areas.
Why LED Outdoor Lighting Strips Are Worth the Investment
The upfront cost of LED outdoor lighting strips might seem higher than old-school string lights or halogen fixtures, but the math changes fast once energy and lifespan enter the picture. A quality LED strip consumes roughly 80% less power than equivalent incandescent or halogen lighting and lasts 25,000 to 50,000 hours, that’s 8 to 15 years of continuous operation, or decades of seasonal use.
Beyond efficiency, LED strips offer control that transforms how outdoor spaces function. A homeowner can adjust brightness, color temperature, or even add color-changing capability without rewiring. Many modern LED strips integrate with smart home systems, letting users control them from a phone or voice assistant. Installation is straightforward enough for DIYers: most plug into standard outlets or hardwire to existing circuits, depending on the setup. There’s no special licensing required for plug-in systems in most jurisdictions, though hardwired installations should follow local electrical codes and may need a permit. The return on investment comes through reduced energy bills, fewer replacement cycles, and the sheer convenience of adjustable lighting tailored to different moods or tasks.
Types of LED Outdoor Lighting Strips and Their Best Uses
Not all LED strips are built the same, and choosing the right type prevents buyer’s remorse and premature failure outdoors.
Waterproof and Weather-Resistant Options
Outdoor LED strips come in two main IP (Ingress Protection) ratings: IP65 and IP67. An IP65-rated strip resists water jets and dust: it’s safe for most eaves, pergolas, and deck railings where it won’t sit in standing water. An IP67-rated strip is fully submersible up to 1 meter for 30 minutes, making it ideal for pool edges, wet areas, or strips that might catch heavy spray. The difference matters: a homeowner saving money with an IP54-rated strip (splashproof but not hoseproof) in a humid, rainy climate is asking for corrosion and early failure. Check the manufacturer’s spec sheet, not just the packaging label. Silicone encapsulation extends lifespan in harsh conditions: aluminum backing adds rigidity and helps dissipate heat, improving LED longevity. For most residential applications, IP67 is overkill unless the strip sits near a water feature or in an extremely humid region. IP65 handles typical decks, soffits, and fence lines just fine.
Color-Changing and Smart LED Strips
RGB (red-green-blue) strips let homeowners cycle through millions of colors or pick a single hue that matches décor or mood. They require a remote or app-based controller, adding $30 to $60 to the base cost, but they’re worth it for accent lighting. Tunable white strips adjust color temperature from warm (2700K) to cool (5000K+) without changing color: these work well for task lighting or areas where flexibility matters but full RGB is unnecessary. Smart-enabled strips integrate with platforms like Alexa, Google Home, or Apple Home, opening up scheduling, geofencing, and automation. A homeowner could set outdoor lights to turn on at sunset automatically, or dim them for a relaxing evening. The trade-off: smart strips cost more upfront and depend on WiFi reliability. In areas with spotty connectivity, a simple remote-controlled RGB strip might be more practical than a WiFi-dependent option.
Installation Tips and Placement Strategies
Installation success hinges on three things: clean surface prep, secure mounting, and proper power routing.
Start by identifying the intended path of the strip. Measure twice, mark with painter’s tape, and inspect for obstacles (conduit, vent pipes, fastener patterns). Most outdoor LED strips use adhesive backing with 3M tape: this works well on clean, dry, non-porous surfaces like aluminum or sealed wood. For concrete, masking tape, or heavily textured surfaces, skip the adhesive and use mounting clips or aluminum channels instead, they cost $10 to $20 and eliminate adhesive failure within months. Clean the mounting surface with a degreaser or rubbing alcohol: any dust, pollen, or film weakens adhesion.
Next, plan the power path. If using a plug-in system with a transformer, locate an outlet within reach of the LED strip’s cable (usually 10 to 16 feet). Avoid running power across foot traffic areas: tuck it along the building perimeter or conceal it in conduit rated for outdoor use. For hardwired installations, consult the strip’s specs, most require either a 12V or 24V DC transformer. Hire a licensed electrician if hardwiring to a main panel: local codes may mandate permits and inspection. Check building codes in your area: many jurisdictions require GFCI (ground-fault circuit interrupter) protection for outdoor 120V circuits, and some have specific requirements for low-voltage systems.
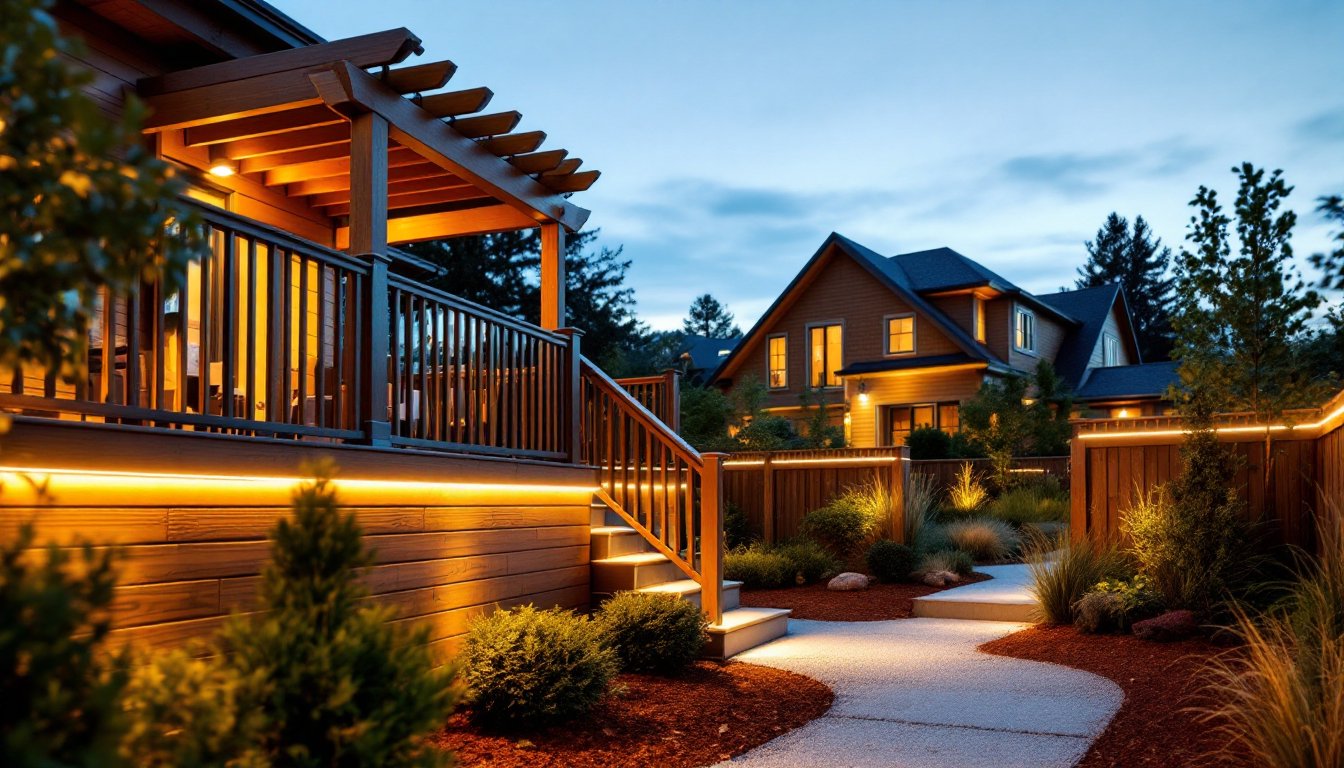
Placement matters for both function and appearance. Deck railings and pergola undersides highlight the space without creating glare. Soffit lighting washes the wall and creates depth. Pathway strips should sit low enough to illuminate the ground without shining directly into eyes. Test the strip’s brightness and color in actual lighting conditions before finalizing installation, a color that looks great on a phone screen may clash with landscape lighting or house color in person.
Maintenance and Durability Considerations
LED strips outlast most outdoor lighting, but neglect invites trouble. Inspect connections every spring, corrosion at the plug or connector terminals degrades performance and creates fire risk. If corrosion appears, clean it with a brass brush and apply dielectric grease to reseal the joint. Check that the silicone caulking around edges hasn’t cracked: a small gap lets moisture seep into the strip’s internals, causing failure within weeks.
Cleaning is straightforward: a dry cloth or soft brush removes dust and debris. In salty coastal environments, rinse with fresh water occasionally and reapply dielectric grease to connectors. Avoid high-pressure washers, which can force water past the seals. If a section stops working, test the transformer first, a failed power supply is more common than LED failure. Most quality brands warrant their strips for 2 to 3 years: if a strip fails under warranty, don’t assume the entire installation is at fault. A single section can usually be replaced or bypassed without replacing the whole run.
UV exposure degrades the adhesive backing and can yellow clear silicone over years: this is cosmetic and doesn’t affect function, but if appearance matters, choose strips with UV-stabilized covers or install under eaves and overhangs where sunlight is limited. Thermal stress from freezing and thawing can crack solder joints on the LED circuit board, especially in cold climates, buy strips rated for your region’s temperature extremes. Most quality strips handle -20°F to 140°F: cheaper options may fail outside that range.
Conclusion
LED outdoor lighting strips deliver modern, efficient illumination that transforms backyards and patios. By choosing the right IP rating for the environment, planning placement carefully, and handling connections with dielectric grease and dry conditions, a homeowner can enjoy years of trouble-free operation. The investment pays off through lower energy bills, minimal maintenance, and the flexibility to adjust lighting on demand. Start small, a single strip on the deck is a perfect way to test the approach before expanding to other areas.

