A 3-light pendant fixture is one of the smartest lighting upgrades a homeowner can install. Unlike a single overhead fixture, three-light pendants deliver layered illumination that transforms a kitchen island, dining table, or entryway into a functional, visually appealing space. These fixtures come in dozens of styles, from sleek industrial to warm rustic, and they’re flexible enough to work in contemporary lofts or traditional homes alike. Better yet, installing one typically requires just basic electrical knowledge and a few hours on a weekend. This guide covers everything: what to look for when shopping, which styles match your space, how to measure and position them correctly, and the key installation steps to get them right the first time.
Table of Contents
ToggleKey Takeaways
- A 3-light pendant fixture distributes illumination across a wider area than a single pendant, creating visual balance and eliminating dark corners over kitchen islands, dining tables, and entryways.
- Proper sizing and spacing are critical: divide your surface width by 2 or 3 to find the ideal pendant diameter, maintain at least 12 inches between pendants, and mount them 30–36 inches above work surfaces.
- Design options range from minimalist contemporary styles with clean lines to industrial and rustic aesthetics featuring exposed bulbs and raw metals, ensuring 3-light pendants complement any home décor.
- Installation requires basic electrical knowledge, including turning off power at the breaker, securing the mounting bracket, correctly connecting ground/neutral/hot wires, and testing with a non-contact voltage tester for safety.
- Choose warm white 2700K LED bulbs for kitchens and dining areas, verify dimmer compatibility if you want adjustable lighting, and ensure your junction box is rated for the fixture’s 5–15 pound weight.
What Are 3-Light Pendant Fixtures?
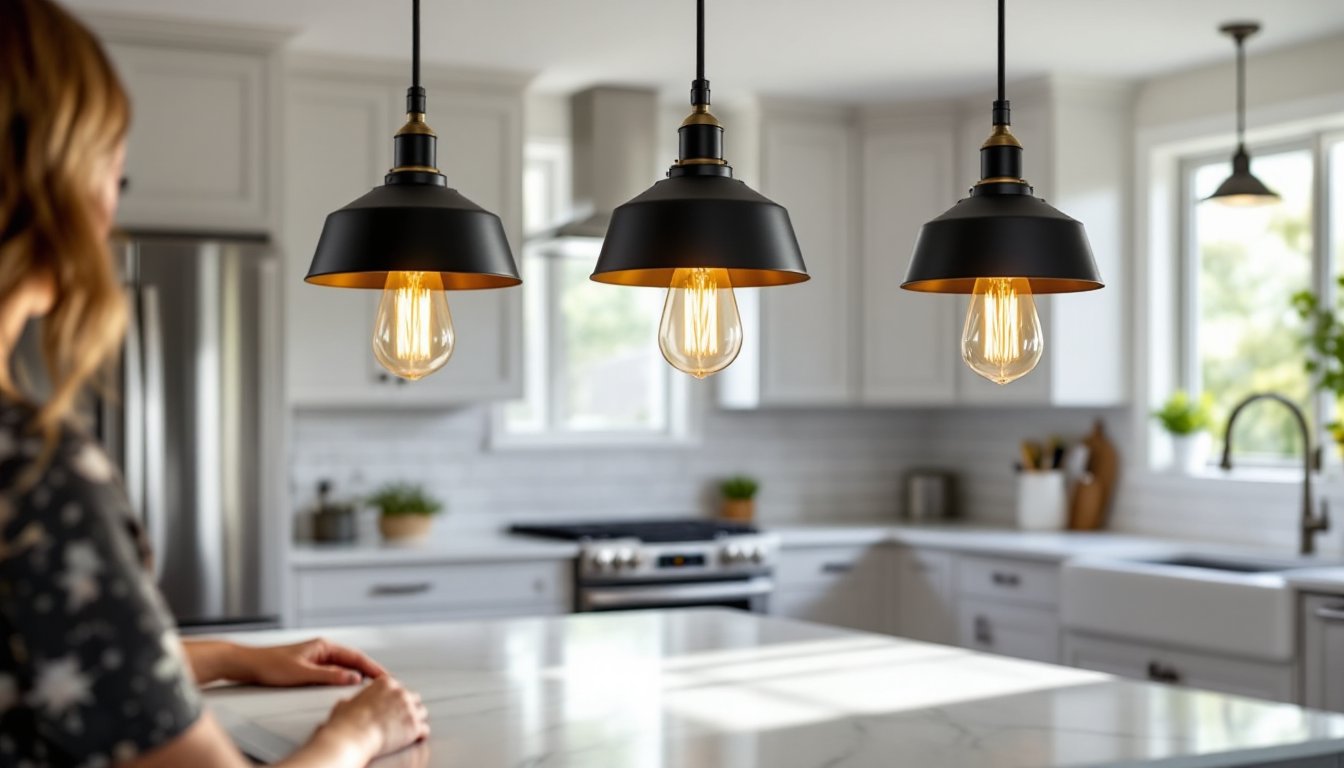
A 3-light pendant fixture is a ceiling-mounted luminaire with three downward-facing light sources, typically suspended by a rod, chain, or cord from an electrical box. Each pendant head hangs independently or as part of a unified assembly, allowing them to cast light over a wider area than a single pendant would.
The fixture connects directly to your home’s electrical supply at the ceiling, so it replaces either an existing light or requires a new junction box. Most models use standard E26 or E27 screw-in bulbs (common household size), though some upscale fixtures accept specialty bulbs like G9 or GU10 pin-base types. Wattage ranges widely, expect anything from 40W per bulb in decorative fixtures to 60W or higher in task-focused designs.
What makes a 3-light pendant worth installing over a single fixture is the distribution. One pendant casts a cone of light directly below: three pendants spread light across a wider zone and create visual balance. They’re especially effective over kitchen islands (typically 24 to 36 inches wide), dining tables, or entryway tables where you want to avoid dark corners.
Key Design Styles and Aesthetics
Contemporary and Minimalist Designs
Minimalist 3-light pendants feature clean lines, geometric shapes, and neutral finishes, matte black, brushed nickel, or white. These typically have no ornamentation and rely on form alone. Common shapes include cylindrical shades, geometric cones, or simple open-frame designs. They work beautifully in modern kitchens, Scandinavian interiors, or any space where you want fixtures to disappear into the background rather than make a statement.
Materials in this category often include powder-coated steel, aluminum, or frosted glass, which diffuse light evenly without harsh shadows. A minimalist 3-light setup over a kitchen island with white or gray shades integrates seamlessly with stainless steel appliances and contemporary cabinetry. Keep in mind that simpler designs often mean higher visibility of bulbs, if you prefer hidden light sources, choose fixtures with opaque shades.
Industrial and Rustic Options
Industrial 3-light pendants embrace exposed bulbs, raw metals, and utilitarian aesthetics. Look for cages, Edison-style filament bulbs, weathered finishes (oil-rubbed bronze, raw steel), and materials like wrought iron, reclaimed wood, or Edison glass. These fixtures pair well with concrete countertops, wooden beams, or brick backsplashes.
Rustic variants swap metal cage for materials like burlap shades, woven rattan, or barn-wood accents. A rustic 3-light pendant in warm bronze with linen shades softens a farmhouse kitchen without looking contrived. Both styles celebrate visible hardware and won’t hide imperfections, in fact, patina and weathering add character. If you choose Edison bulbs, budget for the visual appeal of warm-toned filaments: they cost more than standard bulbs but deliver the authentic glow these styles demand.
Choosing the Right Size and Space Placement
Pendant sizing isn’t just about aesthetics, it’s functional. A fixture that’s too small looks lost: one that’s too large dominates the space and casts wasted light overhead.
For islands and tables, the rule is simple: measure the width of your surface in inches, then divide by 2 or 3 to get a rough pendant diameter. A 36-inch island works well with three 12-inch diameter shades (totaling roughly 38 inches), giving you balanced spacing. If your island is 24 inches wide, 8-inch shades are more proportional. Never place pendants closer than 12 inches apart or they’ll visually merge into one mass.
Height matters too. Mount the bottom of your pendants so they hang 30 to 36 inches above the work surface on an island, or 12 to 20 inches below an 8-foot ceiling if you’re replacing a standard flush-mount. This height clears sightlines while keeping light focused on the surface below. If your ceiling is 9 feet or higher, you can hang pendants slightly lower without obstruction.
Spacing from edges: Suspend the outer pendants at least 6 inches inboard from the island edge to avoid shadowing the overhang where people sit. Center the middle pendant directly above the centerline. Use a temporary paper template secured with tape to test pendant positions before drilling mounting holes, it saves mistakes.
When replacing an existing fixture, check if your junction box is rated for the weight of your new fixture. Most 3-light pendants weigh 5 to 15 pounds: a standard box handles that, but older homes sometimes have undersized or poorly secured boxes. If the existing box is loose or rusty, reinforce it before installation.
Installation Tips and Lighting Considerations
Before you start, turn off power at the breaker and confirm the circuit is dead using a non-contact voltage tester (about $15: it’s worth buying). If you’re uncertain about the existing wiring or your home has knob-and-tube wiring, hire a licensed electrician, don’t guess with electrical work.
Most 3-light pendants come with a mounting bracket and downrod assembly that thread into the junction box. Here’s the basic workflow: (1) Remove the old fixture and cap off the old wires with wire nuts (ceramic or plastic connectors): (2) Install the new bracket and secure it tightly, loose brackets cause flickering and safety hazards: (3) Run new wires (typically 12 AWG for most pendants) from the junction box down the downrod if the fixture doesn’t have a hollow rod: (4) Connect ground (bare copper or green), neutral (white), and hot (black) wires inside the fixture canopy using wire nuts, matching colors: (5) Secure the canopy and test for proper operation.
For lighting quality, choose bulbs carefully. Warm white 2700K bulbs (kelvin color temperature) suit kitchens and dining areas, mimicking incandescent warmth. Cool white 4000K works in modern or industrial spaces. Avoid anything below 2700K in ambient fixtures, it looks too orange. If your fixture uses standard E26 bulbs, go with 10W to 15W LED equivalents to most incandescent or halogen specs: they consume less energy and run cooler.
Dimmer compatibility matters. Not all LED bulbs play nice with dimmers. If you want to dim your pendants, buy “dimmable” LED bulbs explicitly labeled as such, and confirm your fixture and dimmer switch are compatible. Older toggle dimmers often flicker with LEDs: upgrading to a modern LED-compatible dimmer (about $30–60) eliminates this.
Safety reminder: Wear safety glasses and gloves when working overhead. Have a helper steady the fixture during installation. Never assume wires are dead, test every time.
Conclusion
A 3-light pendant fixture elevates any room’s lighting and design in one move. Start by measuring your space honestly, pick a style that complements your décor, and don’t skimp on the installation details, proper height, spacing, and electrical connections ensure years of trouble-free light. Whether you go minimal, industrial, or rustic, the payoff is layered, flattering illumination that beats a single overhead fixture every time.

