LED outdoor landscape lighting has become the go-to choice for homeowners who want a yard that looks polished without draining the wallet or the electrical panel. Unlike older halogen and incandescent systems, modern LED landscape lighting runs cooler, lasts longer, and uses 75–80% less electricity. Whether someone’s lighting a pathway for safety, highlighting a prized tree, or setting ambient mood around a patio, LED solutions deliver flexibility and efficiency in one package. This guide walks through the essentials: why LED wins, how to plan a layout that actually works, which fixtures do what, and how to install and maintain them for years of reliable performance.
Table of Contents
ToggleKey Takeaways
- LED outdoor landscape lighting uses 75–80% less electricity than traditional halogen and incandescent systems while lasting 13–14 years compared to 2,000–4,000 hours for older bulbs.
- Plan your landscape lighting layout by identifying functional areas, measuring voltage drop distances (100-foot limit for standard 12V systems), and sketching fixture positions to prevent costly buried wire issues.
- Choose the right fixture type for each zone: path lights for walkways (8–12 feet apart), uplights for accent features, task lights for safety areas like stairs, and downlights for ambient yard coverage.
- Proper installation requires a quality transformer sized 25% above total wattage, waterproof wire connectors, 6–8 inch burial depth, and careful fixture orientation tested before final setup.
- Maintain your LED system with seasonal checks for wire damage, annual lens cleaning, and consider smart controls or dimmers to further reduce energy consumption and extend fixture lifespan.
Why LED Outdoor Lighting Is the Smart Choice for Your Landscape
LED outdoor landscape lighting outperforms traditional options on nearly every metric that matters to a homeowner. The efficiency gap is huge: an LED landscape light draws 5–8 watts where an incandescent equivalent would pull 50+ watts. Over a season of nightly operation, that translates to real savings on the electricity bill.
Lifespan is another game-changer. A quality LED landscape fixture rated for 50,000 hours will run nightly for 13–14 years before needing replacement. Halogen bulbs top out around 2,000–4,000 hours. That means fewer trips up a ladder or into the crawl space chasing failed lights.
Heat output matters too. LEDs stay cool enough to touch, which means safer installation and operation around plants, patios, and places where people gather. Traditional bulbs generate intense heat that can scorch nearby foliage or become a burn risk.
Color consistency is where LED truly shines for landscape work. Modern LEDs come in carefully calibrated color temperatures, warm 2700K for cozy ambience, neutral 3000K–4000K for general illumination, and crisp 5000K+ for accent work that reads clean and modern. Older halogen systems drifted in color as they aged.
Planning Your LED Landscape Lighting Layout
A solid plan prevents buyer’s remorse and the nightmare of digging up buried wire later. Start by walking the property at dusk with a mental note: which areas feel dark or unwelcoming? Where are sight lines unclear for safety? What features, trees, planters, deck edges, deserve visual interest?
Measure distances from the controller/transformer location to the farthest fixtures. Standard LED landscape systems run on 12-volt low-voltage wire, which means voltage drop becomes an issue beyond 100 feet from the power source. For longer runs, plan a second transformer or use heavier 10-gauge wire (thicker gauge = less drop). This prevents dimming at distant fixtures.
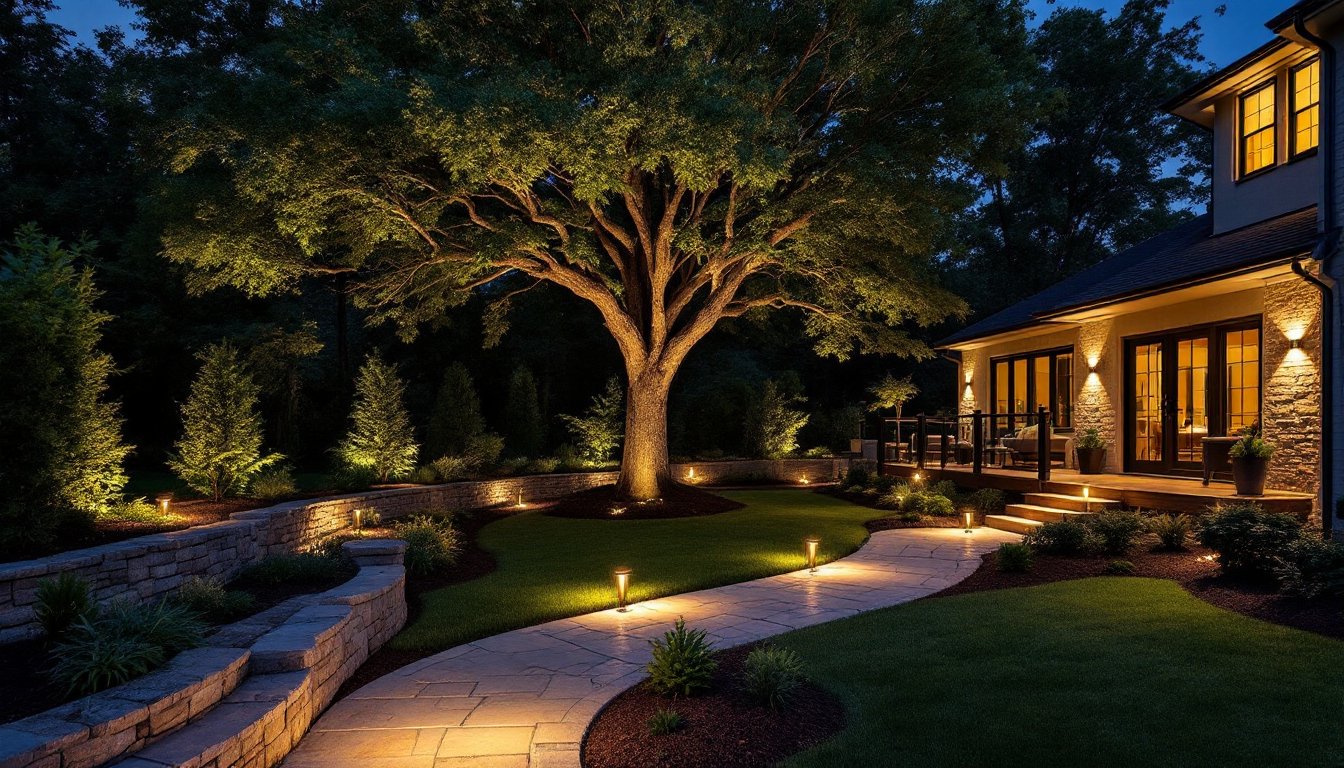
Sketch the layout on paper or in a simple diagram. Mark transformer location, wire paths (preferably along edges or under mulch, not across foot-traffic zones), and fixture positions. Note the spacing for pathway lights: typically 8–12 feet apart on each side of a walkway for even coverage without glare.
Accent Lighting vs. Task Lighting vs. Ambient Lighting
Accent lighting highlights specific features, a specimen tree, stone wall, or architectural detail. Use a narrow beam angle (15°–30°) and aim fixtures upward or across the feature to create drama and depth. Accent lights are typically lower wattage (3–5W) because they’re focused, not spread.
Task lighting illuminates functional areas: entryways, steps, deck surfaces. These need wider beam angles (40°–60°) and sufficient brightness to navigate safely. Aim for footcandles (light intensity at ground level) in the 1–2 range for pathways, 3–5 for stairs. A 10–15W LED spotlight handles most deck or entry lighting.
Ambient lighting sets overall mood and general visibility across the yard. Use multiple fixtures at moderate brightness, spread evenly, to avoid dark pockets. Ambient often combines path lights, uplighting, and soft downlighting from eaves. Keep wattage moderate (5–8W per fixture) and color temperature warm (2700K) for comfortable evening relaxation.
Essential Types of LED Landscape Fixtures
Each fixture type serves a distinct role. Understanding the lineup prevents over-buying the wrong styles.
Path lights are the workhorses of landscape lighting. They’re short posts (6–24 inches tall) with integrated LED and stake for driving into soil or mulch. Look for cast aluminum housings that resist rust and UV degradation. Most draw 3–5W and come with frosted lenses to diffuse light evenly and reduce glare. Spacing them 10 feet apart lights a walkway naturally.
Uplights and spotlights are directional fixtures mounted on ground spikes or wall brackets. They focus light on a specific target, a tree, stone, or facade. A 20° beam angle works for distant trees: wider angles (40°+) suit closer features. Wattage ranges from 5W for subtle accents to 20W+ for dramatic effect.
Deck and patio lights include recessed step lights, rail-mounted fixtures, and post-top lights. Recessed step lights sit flush in stair treads and use low wattage (1–2W) for safe, glare-free visibility. Rail and post lights are more visible, so choose designs that match your home’s aesthetic.
Downlights mount on soffits, under eaves, or in trees to cast light downward. They’re excellent for ambient yard illumination and setting a welcoming tone at entry doors. 10–15W fixtures provide adequate coverage over a patio without excessive brightness.
Well lights and in-ground fixtures sit flush with landscape surfaces and uplight features or wash walls. These are durable (they’re submerged in soil and take foot traffic) but require careful waterproofing and proper depth to avoid water pooling. Use heavy-duty stainless steel or powder-coated aluminum models rated for outdoor burial.
Installation Tips for Long-Lasting Results
Proper installation makes the difference between a system that runs flawlessly and one that fails within a season.
Prepare the site first. Clear vegetation, mark wire paths with chalk or paint, and identify any underground utilities using a locating service (free in most areas: call 811 before digging). Bury wire 6–8 inches deep in a shallow trench, deep enough to avoid lawn mower blades but not so deep that it becomes inaccessible for repairs. Alternatively, run wire along fence lines or under mulch beds.
Use a proper low-voltage transformer. Most DIY systems run 12V DC, which is safe and efficient but depends on a quality transformer rated for the total wattage of all connected fixtures. Don’t overload: if fixtures total 150W and the transformer is rated 150W, it’s working at maximum capacity with no headroom. Upsize by 25% when possible. Install the transformer in a dry, accessible location, a garage or weatherproof cabinet near an outdoor outlet.
Strip and connect wire correctly. When splicing 12V landscape wire, use waterproof connectors (solder-filled butt connectors or twist-on connectors designed for outdoor use). Bare copper corrodes quickly: poor connections cause voltage drop and dimming. Strip 1/2 inch of insulation, insert wire fully into the connector, and crimp firmly with a proper crimper.
Orient fixtures for intended effect. Aim path lights straight down for even coverage. Point uplights at a 45° angle toward trees or features. Avoid pointing lights at windows or neighbor properties. Test at dusk before burying wire to ensure angles and brightness suit the space.
Secure wire and fixtures. Use landscape staples or clips (not nails: they cut wire) every 2–3 feet along above-ground runs. For path lights and spikes, push them straight into soil or mulch, they should be snug but not forced. A light tap with a mallet helps: don’t hammer aggressively or you’ll crack the fixture.
Run a brief test. Before calling the job done, turn on the system during daylight and again at dusk. Check for dimming at distant fixtures (sign of voltage drop), burned-out LEDs, or misaligned beams. Address issues immediately while the system is accessible.
Maintenance and Smart Control Options
LED landscape lighting is remarkably low-maintenance, but a little care extends its life and keeps the system looking sharp.
Seasonal checks are plenty. In spring, clear any mulch or soil buildup around fixtures, it blocks light and traps moisture. Inspect wire for nicks or exposed copper. Check for loose fixtures after winter freeze-thaw cycles and re-stake path lights if frost heave lifted them.
Clean lenses and covers annually. Dust and pollen dim output noticeably. A soft brush and mild soap work fine: avoid harsh solvents that cloud acrylic lenses. Wipe fixtures dry to prevent mineral deposits in hard-water areas.
Replace dead LEDs thoughtfully. Most landscape fixture LEDs aren’t user-replaceable: they’re soldered into the circuit board. If an LED fails, replace the entire fixture. Buy the same wattage and color temperature to avoid mismatches. Quality fixtures run 50,000+ hours, so failures are rare in the first 5–7 years.
Smart controls add convenience. Modern LED landscape systems integrate with WiFi timers and smart switches that let homeowners set schedules from a phone, dim lights remotely, or sync with smart home routines. A basic photocell timer (50–100 dollars) turns lights on at dusk and off at dawn automatically, no daily manual switching. For tech-savvy users, zigbee or Z-wave modules offer app control and voice integration with Alexa or Google Home.
Dimmers save energy and mood. If the system includes dimmable fixtures (most modern LEDs are), a dimmer switch or smart controller lets homeowners reduce brightness on mild evenings or when the yard isn’t in use, cutting energy consumption further. Even a 30% reduction in brightness extends LED lifespan and lowers the bill.
Conclusion
LED outdoor landscape lighting transforms a dark, uninviting yard into a safe, beautiful space that’s a joy to use after sunset. The efficiency gains and long lifespan justify the upfront investment within a few seasons. With thoughtful planning, honest assessment of accent versus task versus ambient lighting needs, and careful installation, a homeowner can build a system that looks professional and runs reliably for more than a decade. Start small if unsure, test the layout with stakes and temporary fixtures, and expand as confidence grows. The best landscape lighting isn’t the most expensive, it’s the one that solves real problems and matches the space.

