Linear kitchen island lighting has become the go-to solution for homeowners wanting to combine form and function above their kitchen islands. Unlike traditional pendant lights that hang individually, linear island lighting fixtures run horizontally across the island, delivering both ambient illumination and visual impact. This design approach works especially well in kitchens where the island serves as both a workspace and a gathering spot. Whether renovating an existing kitchen or building new, understanding how to select and install linear kitchen island lighting ensures the fixture integrates seamlessly with cabinetry, countertops, and the overall kitchen layout.
Table of Contents
ToggleKey Takeaways
- Linear kitchen island lighting distributes illumination evenly across the entire work surface, eliminating shadows and providing superior task lighting compared to traditional pendant fixtures.
- Proper sizing requires the fixture to be 6 to 12 inches shorter than the island length, mounted 24 to 30 inches above the countertop to optimize visibility and prevent glare.
- Linear island lighting simplifies kitchen design by eliminating the need to choose between multiple individual pendants while offering contemporary, industrial, and transitional style options.
- Installation requires locating ceiling joists, ensuring the fixture’s power requirements (typically 60–100 watts) match your kitchen circuit capacity, and consulting a licensed electrician if new wiring is needed.
- Linear fixtures integrate seamlessly with modern kitchen materials like stainless steel, quartz countertops, and contemporary cabinetry while making the kitchen feel more open and spacious.
What Is Linear Kitchen Island Lighting?
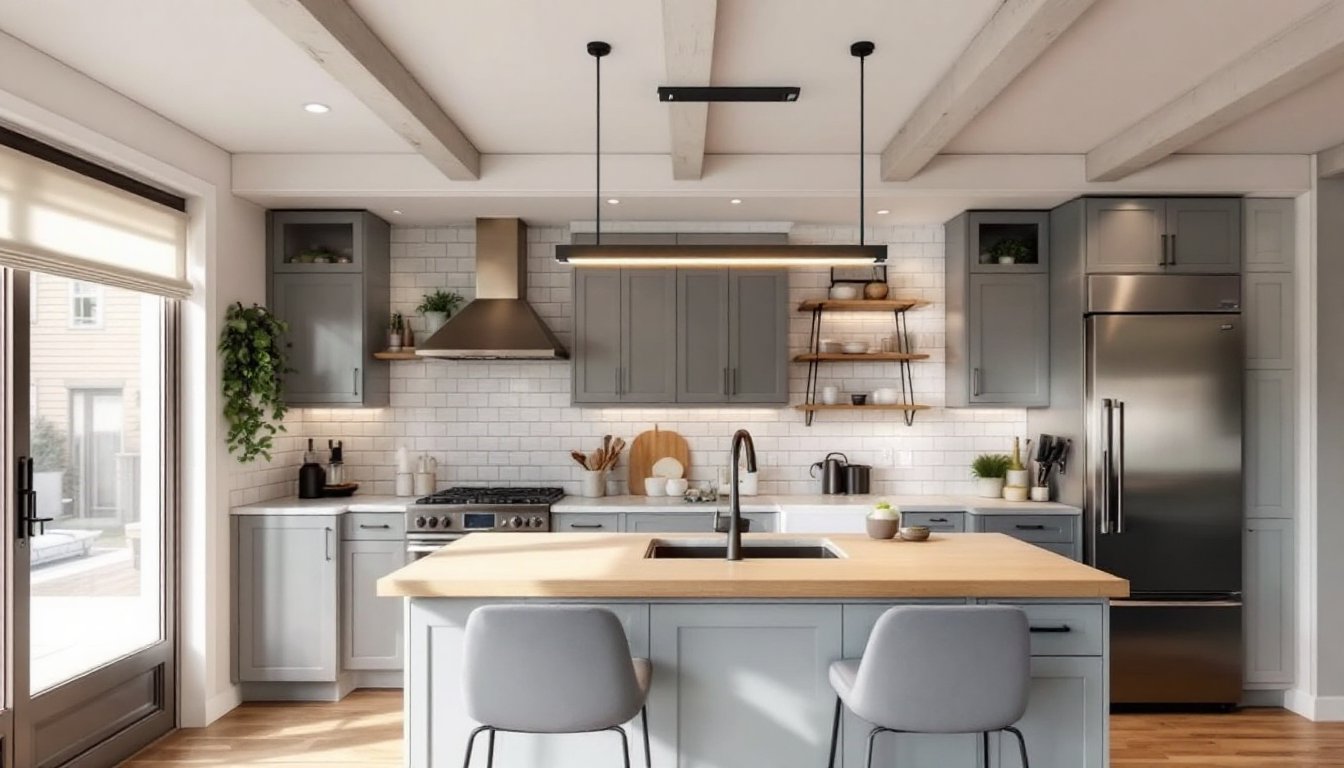
Linear kitchen island lighting refers to a continuous or near-continuous fixture that runs horizontally along the length of an island. These fixtures house multiple light sources, usually LED bulbs, though some use halogen or incandescent, all contained within a single elongated housing. The housing can be track-mounted, pendant-style with multiple heads along a wire, or a solid bar that attaches directly to the ceiling.
The key difference between linear and traditional pendant lighting is coverage and uniformity. A single pendant over an island creates a focal point and pools of light: linear fixtures distribute illumination more evenly across the entire work surface. This even distribution makes linear island lighting practical for meal prep, assignments, or any task requiring consistent visibility. The fixture typically comes in lengths ranging from 24 inches to 60+ inches, allowing customization to fit various island sizes.
Linear fixtures also simplify the design conversation. Instead of deciding between three, four, or five individual pendants, and worrying about spacing, a single linear piece handles the visual and functional job. Most linear kitchen island lighting can dim, accepts standard bulb types, and mounts using standard ceiling brackets, making installation straightforward for homeowners with basic electrical knowledge.
Why Linear Island Lighting Works for Modern Kitchens
Linear island lighting aligns perfectly with modern kitchen design trends and practical needs. First, it maximizes visual space. A lean, horizontal fixture doesn’t clutter the eye the way multiple hanging elements can, keeping sightlines clean and the kitchen feeling open. Kitchens increasingly function as the heart of the home, serving as both cooking workspace and social hub, and linear lighting accommodates both roles without visual fussiness.
Second, linear fixtures provide superior task lighting. Islands often house prep sinks, cooktops, or main work zones. Task lighting must eliminate shadows and provide bright, focused illumination directly over these areas. A well-chosen linear fixture positioned 24 to 30 inches above the countertop delivers exactly that. Many linear options include dimming capabilities, so homeowners can adjust from bright work mode to ambient evening mode without swapping fixtures.
Third, linear fixtures integrate with modern materials and finishes. Stainless steel, brushed nickel, matte black, and brass linear housings pair naturally with contemporary cabinets, quartz countertops, and stainless appliances. Unlike chunky traditional chandeliers, linear designs feel intentional and architectural, they add to the space without overwhelming it. Finally, linear island lighting simplifies electrical planning. Instead of calculating multiple junction boxes and circuit loads for three separate pendants, one fixture and one wire run mean fewer connection points and less complex wiring.
Design Styles and Aesthetic Options
Contemporary and Minimalist Designs
Contemporary linear fixtures emphasize clean lines and understated elegance. Look for models with sleek metal housings, brushed aluminum or matte black, and minimal ornamentation. Many contemporary designs use integrated LED strips hidden within a frosted diffuser, creating a soft, even glow without exposed bulbs. These fixtures typically run 36 to 48 inches and sit 24 to 30 inches above the island countertop.
Minimalist designs take restraint further. Some homeowners opt for ultra-thin bar fixtures with no visible hardware beyond a slim mounting bracket. These fixtures work best in kitchens with simple cabinetry and minimal visual clutter elsewhere. A brushed nickel or white powdercoat finish often complements light wood cabinets and stone countertops. When selecting a minimalist fixture, confirm the bulb type and wattage are compatible with your home’s electrical panel: most modern kitchens support 15- to 20-amp circuits dedicated to kitchen lighting.
Industrial and Transitional Looks
Industrial linear fixtures celebrate visible hardware and raw materials. Expect to see Edison bulbs, exposed metal conduit, and weathered finishes like antiqued brass or aged copper. These fixtures can run longer, 48 to 72 inches, since their bold aesthetic works well with larger islands. They pair exceptionally well with open-concept kitchens that share space with dining or living areas.
Transitional designs split the difference, borrowing warmth from traditional pendants and restraint from modern aesthetics. A brushed gold or warm brass linear fixture with subtle geometric detailing can bridge a kitchen that mixes modern cabinetry with traditional tile or architectural details. Many transitional pieces include a combination of solid housing and open spaces that let light scatter naturally. When choosing between these styles, consider sight lines from adjacent living spaces, the island lighting is often visible from the dining room or living room, so it should feel cohesive with your overall home design.
Installation and Sizing Considerations
Sizing your linear fixture starts with the island dimensions. A general rule: the fixture should be 6 to 12 inches shorter than the island length to prevent overhang on short ends. If your island is 48 inches long, a 36- to 42-inch fixture provides balanced visual proportion. Measure twice before ordering, since most linear fixtures are custom-cut or come in fixed lengths.
Height matters tremendously. The bottom of the fixture should sit 24 to 30 inches above the island countertop. Less than 24 inches risks glare and headbumps for taller users: more than 30 inches reduces task-lighting effectiveness. If your ceiling is only 8 feet tall, confirm the fixture won’t feel oppressive. Sketch the install on graph paper to visualize the proportions.
Electrical prep is non-negotiable. Confirm the fixture’s power requirements, most linear fixtures draw 60 to 100 watts, within standard kitchen circuits. The mounting location should have access to electrical conduit or a ceiling box. If you need to run new wiring, consult a licensed electrician: this work often requires a permit. Local electrical codes (following the National Electrical Code, or NEC) govern placement and require GFCI protection within 6 feet of a sink.
Mounting involves three steps: First, locate ceiling joists using a stud finder, mounting brackets must attach to framing, not just drywall. Mark joist locations with a pencil. Second, drill holes for mounting brackets and install them using appropriate fasteners (usually 2.5-inch wood screws into joists). Third, route the electrical connection and secure the fixture housing to the brackets. Most fixtures include hardware: follow the manufacturer’s diagram closely. If drywall repair is needed after install, use spackling compound and fine-grit sandpaper, then prime and paint to match the ceiling.
Common mistakes: Hanging the fixture too low (glare and headbumps), too high (inadequate task light), or off-center (unbalanced appearance). Take time during layout. If the island isn’t centered in the kitchen, you can offset the fixture slightly, but keep it parallel to the island’s long axis. Crooked installations look amateur and waste the fixture’s design impact.
Conclusion
Linear kitchen island lighting transforms an island from a simple work surface into a designed architectural element. By choosing the right size, style, and height, and taking care during installation, homeowners can add both function and visual appeal in a single fixture. Whether embracing minimalist simplicity or industrial character, linear options exist for every kitchen aesthetic. Proper sizing, correct height, and solid electrical work ensure the fixture performs beautifully for years.

