A well-lit deck doesn’t just extend the usability of outdoor space into evening hours, it transforms the whole aesthetic and creates a safer environment for guests. Deck rail lighting ideas range from understated ambient glow to bold architectural accents, and the options available today are far more practical and affordable than even five years ago. Whether a homeowner is updating an older deck, building new, or simply refreshing the nighttime look, modern solutions span solar-powered fixtures, programmable LED systems, and sleek mounted hardware. This guide covers the practical approaches to deck rail lighting, from installation considerations to design strategy, helping readers choose what actually fits their deck, climate, and maintenance tolerance.
Table of Contents
ToggleKey Takeaways
- Deck rail lighting ideas range from solar-powered fixtures to hardwired LED strips and smart systems, each offering distinct benefits for different installation scenarios and budgets.
- LED strip lights deliver modern, continuous illumination with minimal clutter; choose warm white (3000K) for inviting ambiance and IP65+ ratings for water resistance.
- Solar-powered rail lights are the fastest retrofit option, but quality matters—look for monocrystalline panels and 2000+ mAh batteries to ensure 6 to 8 hours of runtime through winter months.
- Post cap lights and railing-mounted fixtures create visual rhythm when spaced 4 to 6 feet apart, combining ambient lighting with design impact across your deck structure.
- Recessed and under-rail lighting require planning and electrical knowledge but deliver a professional, integrated look; always verify local building codes for stair illumination requirements.
- Smart lighting systems enable remote control and automation but can create ecosystem lock-in; start with one approach like solar post caps and expand based on seasonal performance testing.
LED Strip Lights for Modern Ambiance
LED strip lights mounted along deck rails deliver a clean, contemporary look with minimal visual clutter. These typically come in 16-foot rolls or custom lengths, with adhesive backing or screw-mount channels. The key advantage is continuous, even illumination that softens transitions between deck sections, particularly effective for composite or metal railings where the light edge becomes part of the design.
When selecting LED strips, check the color temperature (measured in Kelvin): 3000K reads warm and inviting, while 5000K leans cooler and more clinical. Most DIYers prefer warm white for residential decks. IP65 or higher ratings indicate water resistance: anything lower will fail in rain or high-moisture environments. Adhesive-backed strips are fastest to install but require clean, dry substrate, wipe rails with rubbing alcohol and let cure fully before mounting.
Screw-mount aluminum channels offer better durability and heat dissipation, especially in high-temperature climates. The channel protects the strip itself and provides a finished look. Installation is straightforward: measure the rail length, mark mounting holes every 16 to 24 inches, drill pilot holes, and secure with stainless steel fasteners to resist corrosion. Connect the power supply inside the deck structure or run waterproof conduit to an outlet.
Common installation mistakes include mounting strips while the railing is wet, failing to account for thermal expansion in aluminum channels (leave small gaps), and running power cables in unprotected locations where they’ll degrade. Strips are rated for roughly 25,000 hours of operation: plan for replacement every 4 to 5 years if used nightly.
Solar-Powered Rail Lights for Eco-Friendly Illumination
Solar-powered rail lights eliminate the need for electrical runs, making them the fastest option for retrofit installations. These fixtures charge during the day and illuminate automatically at dusk via built-in photocells or motion sensors. Quality matters significantly: cheap models fade after one season, while mid-range options (roughly $80–150 per set) typically last 3 to 4 years.
Look for lights with monocrystalline solar panels (more efficient in low light and cloudy conditions) rather than polycrystalline alternatives. Battery capacity, measured in mAh or watt-hours, determines runtime: 800 mAh batteries often deliver only 2 to 4 hours of useful light on a short winter day, while 2000+ mAh units consistently run 6 to 8 hours. Test before fully committing: install a few units and observe their behavior through different seasons.
Mounting is simple: most clamp to the railing using stainless steel hardware, requiring no drilling or wiring. Ensure direct sun exposure on the solar panel for at least 6 hours daily. Shaded decks or those under mature trees won’t generate enough charge. Clean panels twice a year with a soft cloth to remove dust and pollen buildup.
A practical hybrid approach uses solar lights for general visibility along high-traffic areas and hardwired LED strips in focal zones or seating areas where consistent, brighter light is desired. This balances upfront cost, maintenance, and aesthetic flexibility. Solar lights are also ideal for rental properties where running electrical is problematic or leasing terms restrict permanent installations.
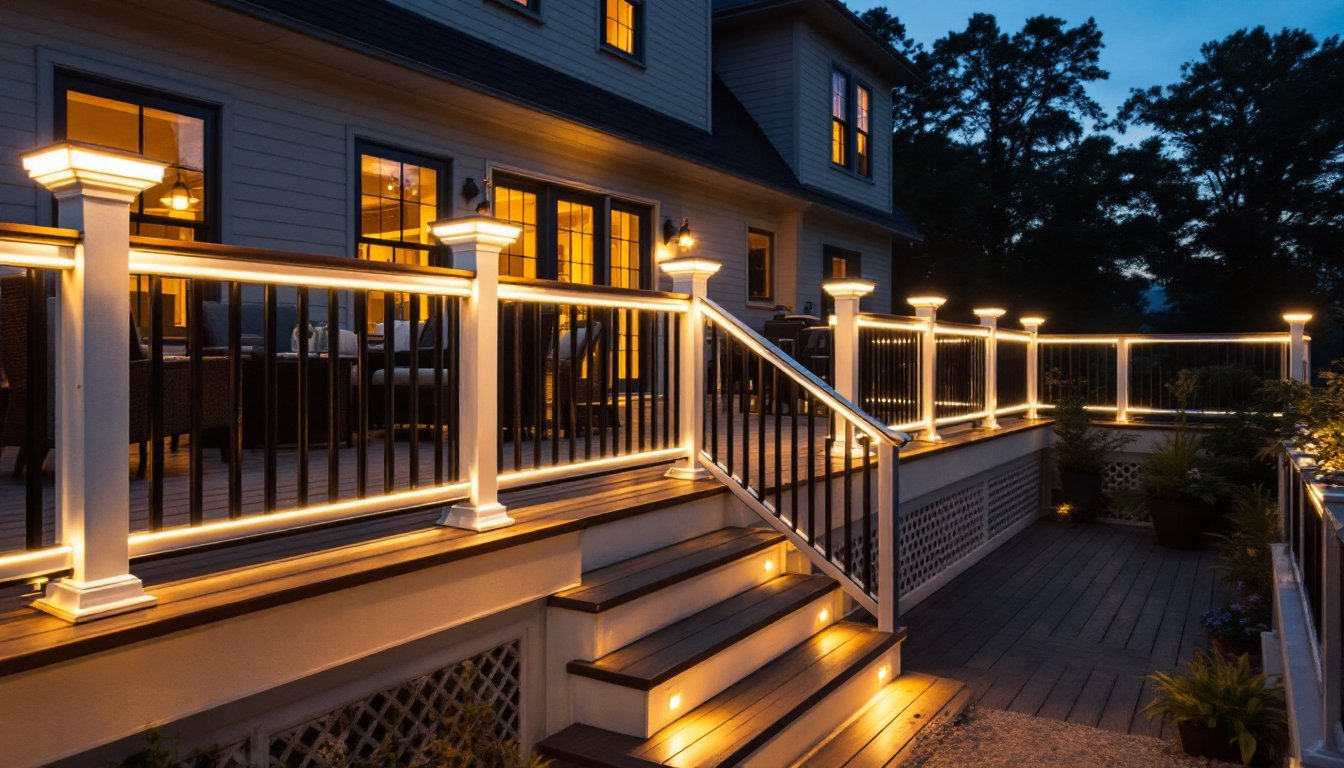
Post Cap Lights and Railing Mounted Fixtures
Post cap lights sit atop vertical deck posts and provide both ambient light and visual punctuation along the railing line. They’re available as solar, low-voltage, or hardwired models. Solar post caps are the simplest DIY choice, requiring only positioning on top of the post, no tools or wiring needed. Low-voltage systems require running 12V cable through the deck structure, typically a more involved installation than solar.
When choosing post caps, verify the post size compatibility: standard residential posts are 4×4 (actual dimension 3.5″ × 3.5″), but some caps fit only 5×5 posts or have adjustable jaws. Measure twice before purchasing. Installation is straightforward for solar versions, just set and forget. For low-voltage, drill small cable entry holes and route the 12V line back to a transformer located near a protected outlet or buried in conduit.
Railing-mounted fixtures clamp directly to horizontal or vertical rail members. These are available in numerous styles: wall sconce–inspired designs, minimalist cubes, and deck-specific fixtures. They’re particularly effective on composite or vinyl railings where drilling is avoidable. Use stainless steel clamps and hardware: galvanized fasteners corrode faster on composite surfaces.
A common design approach is to space post caps every 4 to 6 feet and supplement with additional railing-mounted lights between posts for even coverage. This layering avoids dark spots while keeping the visual rhythm clean. Costs for quality post cap lights range from $30–80 per unit (solar) to $100–200+ for hardwired options.
Recessed and Under-Rail Lighting Solutions
Recessed deck rail lights sit flush within the railing itself, creating a subtle, integrated look. They’re best incorporated during deck construction or major railing replacement, as retrofitting requires opening the railing structure. Horizontal rails with solid caps (not open balusters) are ideal candidates for this approach.
Installation involves routing power lines within the railing frame and drilling holes for light fixture housings. Typical spacing is 12 to 18 inches apart for even illumination. Use rated deck railing fixtures, standard recessed lights aren’t designed for outdoor moisture exposure. Fixtures with IP67 ratings withstand direct rain and standing water.
Under-rail lighting mounts to the underside of deck joists or railings, washing light downward onto the deck surface and stairs. This provides excellent safety illumination for stepping, particularly on multi-level decks. Low-voltage or 12V LED tape works well for this application. Route cable through notched joist channels or within the deck structure to avoid visible dangling wires.
These recessed and under-rail options require more planning and often demand basic electrical knowledge. If you’re unfamiliar with low-voltage wiring, hire a licensed electrician for the power supply and transformer setup. A single mistake, incorrect polarity, exposed connections, or undersized wiring, can create fire or shock hazards. The upside is a finished appearance that looks professionally designed and built into the deck itself.
Smart Lighting Systems for Customizable Control
Smart deck rail lighting integrates with home automation platforms (Apple HomeKit, Google Home, Alexa) for remote control, scheduling, and scene creation. These systems use WiFi or Zigbee protocols and typically include app-based controls, voice commands, and automated dimming based on time or motion.
Options range from plug-and-play solar smart lights (roughly $50–100 per fixture) to hardwired systems requiring an electrician (often $1,500–3,000+ installed). Mid-range systems using low-voltage 12V hardwiring with smart hubs offer a practical balance, they’re professional-grade but approachable for a handy homeowner.
Smart lighting shines for entertaining: imagine dimming lights for movie night, brightening them for a gathering, or triggering color-change sequences for holiday celebrations. Motion sensors can activate lights only when needed, saving energy. Scheduling ensures dusk activation without manual intervention year-round, accounting for seasonal daylight shifts automatically.
Before investing in a smart system, consider ecosystem lock-in: ensure selected fixtures work with your existing home platform. Also verify integration with any existing outdoor lighting. A mixed system, some smart, some hardwired traditional, is common and often more practical than going all-in immediately.
Design Tips for Maximum Impact
Effective deck rail lighting balances visibility, ambiance, and aesthetic cohesion. Start by identifying the deck’s purpose: a dining area prioritizes functional light on surfaces, while an entryway deck emphasizes welcoming glow and safety. Use layered lighting, combine ambient post caps with brighter task lights near seating and accent strips for visual interest.
Consider the deck’s architectural style. Modern composite decks pair well with minimalist LED strips or sleek mounted fixtures. Traditional treated-wood decks benefit from warm-toned solar post caps with bronze or black housings. Mix finishes sparingly: too many colors and styles look chaotic.
Account for light spill onto neighboring properties and landscape. Downward-facing lights reduce glare and trespass. If your deck overlooks a neighbor’s space, position brighter fixtures inward and use warmer color temperatures, which feel less intrusive than cool white.
Test lighting at night before finalizing placement. Shadows and brightness feel different in daylight planning sessions. Install temporary LED strips or borrow solar lights from a friend to visualize the effect. Spacing varies: 4-foot intervals work for ambient coverage, while accent lights may be 6 to 8 feet apart.
Safety isn’t optional: ensure stairs, level changes, and path edges are well-lit to prevent trips and falls. Building codes in many jurisdictions require minimum illumination levels for deck stairs (often 10 to 50 foot-candles): check local code or consult an inspector if your deck is part of an exit route.
Conclusion
Deck rail lighting transforms outdoor space into a functional, inviting area that extends living space well into evening. Whether opting for solar-powered simplicity, hardwired LED strips, or smart systems, the key is choosing solutions that match the deck’s structure, the homeowner’s technical comfort, and long-term maintenance expectations. Start with one approach, perhaps solar post caps, observe results through different seasons, and build from there. A thoughtfully lit deck is one that gets used and enjoyed year-round.

