Black kitchen pendant lights have become a cornerstone of contemporary home design, offering a versatile way to anchor a kitchen’s aesthetic while delivering practical task lighting. Whether someone is planning a full kitchen remodel or simply swapping out outdated fixtures, black pendants work across modern, industrial, minimalist, and even transitional styles. They’re forgiving, high contrast against light cabinetry and backsplashes, and they don’t date quickly. This guide walks through why black pendants work so well, what styles and sizes make sense for different kitchens, and how to install them correctly so the investment lasts.
Table of Contents
ToggleKey Takeaways
- Black kitchen pendant lighting works across modern, industrial, minimalist, and transitional styles without dating quickly, making it a versatile anchor for contemporary home design.
- For island sizing, choose pendants with 10–14 inch diameters hung 30–36 inches above the work surface, spacing them 24–30 inches apart; a 6-foot island typically needs two pendants while an 8-footer needs three.
- Black pendants hide dust and kitchen splatters better than shiny finishes, with matte or satin black finishes aging more gracefully than glossy options.
- Installation requires turning off power, verifying the mounting strap is secured to a joist, and carefully connecting ground (bare copper), neutral (white), and hot (black) wires—avoid common mistakes like daisy-chaining circuits or using non-dimmable LED bulbs on dimmers.
- Mock up pendant placement with painter’s tape on the ceiling before installing to verify headroom clearance and ensure positioning enhances rather than clutters the kitchen layout.
Why Black Pendant Lights Are a Kitchen Design Essential
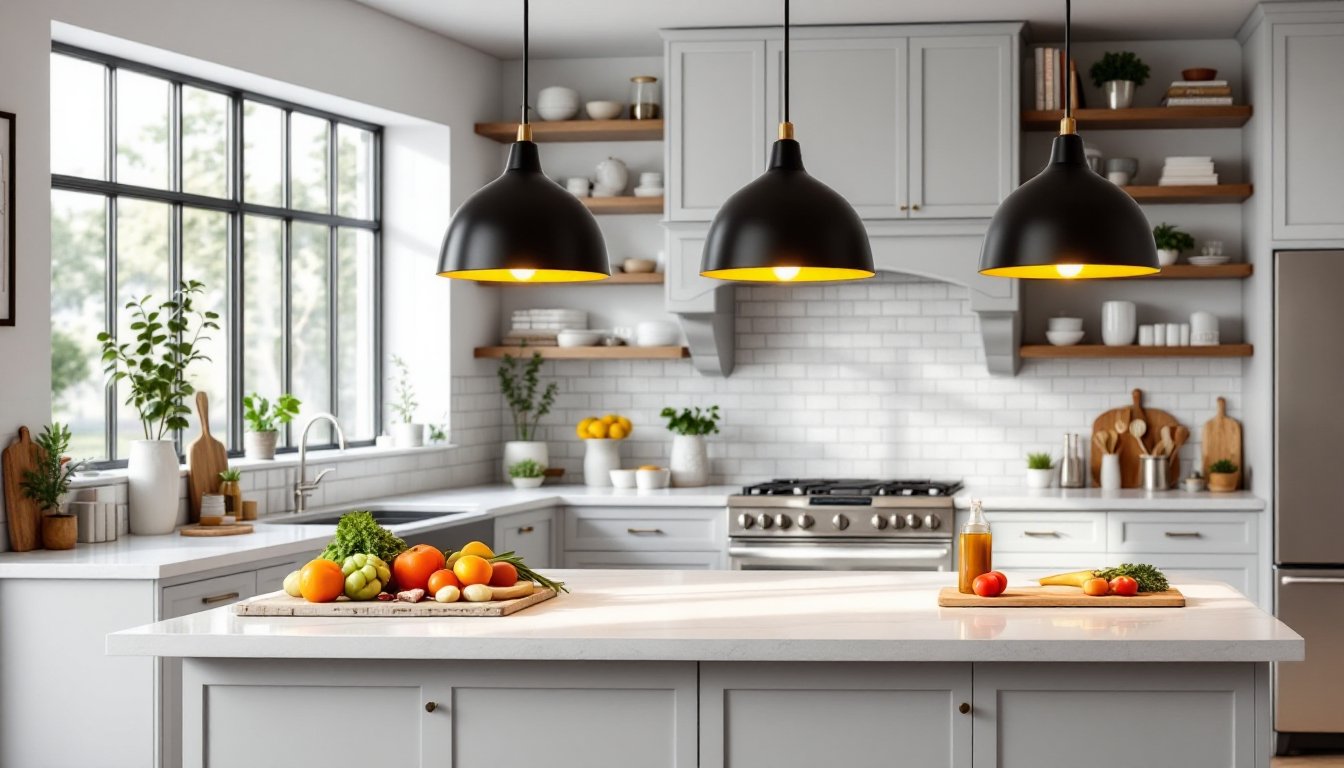
Black pendants pull visual weight down from the ceiling and create focal points above kitchen islands, bars, or sink zones, areas where task lighting is non-negotiable anyway. Unlike brushed nickel or chrome, black doesn’t wash out in bright kitchen light: it pops. That makes it an anchor, especially in kitchens with white or light-gray cabinetry.
From a practical standpoint, black is forgiving. It hides dust, fingerprints, and the inevitable kitchen spatters better than shiny finishes. Matte or satin black finishes tend to age better than glossy ones, which can show wear patterns from cleaning.
Black also bridges style gaps. A black pendant works equally well in a farmhouse kitchen with shiplap or in a sleek, contemporary space with stainless steel appliances. It reads as intentional without being trendy in a way that screams “2020s renovation.” That flexibility matters when kitchens are expensive investments.
Different Types of Black Kitchen Pendant Lights
Industrial and Contemporary Styles
Industrial black pendants typically feature metal cages, exposed bulbs, or Edison-style filament designs. Common materials include steel, iron, or aluminum, durable choices that weather kitchen moisture and heat. Look for pendants with IP54 or IP65 rated fixtures if they’ll hang near a sink or cook zone: the rating indicates moisture resistance (higher numbers = more protection).
Contemporary styles lean cleaner: smooth black metal domes, geometric shapes, or minimalist cylinders. They often conceal the bulb entirely, which creates a sleeker silhouette and directs light downward more efficiently. If choosing this route, confirm the fixture supports dimmable LED bulbs if ambient lighting control matters in the kitchen layout.
Minimalist and Scandinavian Designs
Minimalist black pendants strip away ornamentation, think flat discs, bell shapes, or subtle curves in powder-coated steel or painted aluminum. These work beautifully in modern kitchens where the goal is quiet, functional beauty.
Scandinavian pendants often blend black with natural wood accents, glass, or warm brass details. They’re typically lighter in visual weight than industrial models and pair well with light wood cabinetry or open shelving. If the kitchen has a Scandinavian or Japandi lean, look for pendants that include a subtle material contrast, black metal frame with warm brass hardware, for instance.
How to Choose the Right Size and Placement for Your Kitchen
Pendant size matters more than most DIYers realize. Too small, and they vanish visually: too large, and they feel heavy-handed or obstruct sightlines across the kitchen.
For a standard kitchen island (36–42 inches wide): Choose pendants with a 10–14 inch diameter. Hang them 30–36 inches above the work surface (island top, bar height, or countertop). Space multiple pendants 24–30 inches apart center-to-center to avoid a cluttered look. A 6-foot island typically looks balanced with two pendants: an 8-footer benefits from three.
For a peninsula or breakfast bar: Same sizing logic applies. If the bar protrudes from cabinets, pendants should hang at the outer edge to light the seating area, not just the prep surface.
Above a kitchen sink: A single larger pendant (14–16 inches) or a pair of smaller ones (10–12 inches) both work. Height matters here, 36 inches above the sink rim is standard, but adjust if the window sill is low or if upper cabinets sit close.
Ceiling height counts. In kitchens with 8-foot ceilings, shorter pendant stems (6–12 inches) keep headroom comfortable. Vaulted or 10-foot-plus ceilings allow longer hangers, even up to 18–24 inches, without feeling like they’re in the walking path.
Always mock up placement first. Use painter’s tape on the ceiling to mark pendant positions, then step back and look. Walk the traffic path: make sure no one will clip their head. If the kitchen island isn’t perfectly centered under the pendants in the plan, that’s okay, slight offset sometimes reads better than geometric perfection.
Installation Tips and Considerations
Safety first: Pendant installation involves electrical work. In most jurisdictions, homeowners can swap out fixtures if the wiring is already in place, but installing new circuits or moving ceiling junction boxes requires a licensed electrician. Check local codes: some areas mandate a permit for any fixture work. Don’t skip this, it protects resale value and insurance.
Tools and materials needed:
- Voltage tester (non-negotiable for verifying power is off)
- Wire strippers and connectors (12 AWG or 14 AWG, depending on circuit gauge)
- Drywall anchors or a stud finder if tapping into ceiling joists
- Adjustable pendant hangers (most fixtures include a mounting strap)
- Appropriate bulbs: A19 or A21 LEDs (60–100W equivalent) are standard, but always check the fixture’s max wattage and bulb type
The process:
- Turn off power at the breaker: verify it’s off with the voltage tester.
- Remove the old fixture (if replacing) by disconnecting the wires inside the ceiling canopy.
- Check that the mounting strap is securely fastened to a joist or a pancake box with a brace between joists. Pendants are heavier than flush mounts, so support matters.
- Connect ground wires (bare copper), then neutrals (white to white), then hot wires (black to black) using wire connectors. Twist connections firmly, loose connections cause flickering or failure.
- Secure the canopy and install the shade or cover. Don’t overtighten: black fixtures can show fingerprints and scratches if handled roughly.
- Install the bulb and test before leaving the room.
If the existing outlet is positioned off-center from where a pendant should hang, use a threaded stem or adjustable hanger kit to offset it. Most modern fixtures come with these.
Common mistakes to avoid: Don’t daisy-chain multiple pendant circuits together without verifying the shared circuit can handle the load (typically 15 or 20 amps max). Don’t use non-dimmable LED bulbs on a dimmer circuit, they’ll flicker or buzz. If the bulb shows prominently, match the color temperature: 3000K (warm white) suits most kitchens: 4000K (neutral) reads cold in residential settings.
Conclusion
Black kitchen pendant lights deliver both form and function. Choosing the right style means matching the kitchen’s aesthetic, whether industrial, contemporary, or minimalist. Sizing and placement are about balance: large enough to make a visual statement, high enough to avoid headroom issues, spaced so they feel intentional rather than random. Installation is straightforward if the wiring already exists, but respect electrical code requirements and use a professional if new circuits are needed. Done right, black pendants anchor a kitchen for years.

